Login with the initial password and changing the password
As usual with web-based applications, you need to log in before using myconvento.
At myconvento.com/public/login enter your username and password and click on “Login“.
If this is the first login with the initial password, you will be asked to change your password. Please note that only the special characters in the brackets are allowed (“&” for example does not work).
Complete this process with “Save login data“.

Der Home-Bildschirm – Ihr Dashboard
The Home-Screen
The Home screen generally looks the same as you left it the last time you logged out.
At the top of the screen there is a quick navigation bar that allows you to jump to a specific point within a main module quickly and easily.


It also contains the following additional icons:
 The magnifying glass symbol opens a quick search here, in which you can search for contacts, messages, dispatch orders or campaigns/events.
 The First aid case contains “Service and Support”; here you can open the support chat, send messages to the support, open the remote tool “Join.me” we use, access the online help and find out which of your colleagues is also logged in at the moment.
 The flag symbol allows you to switch between the German and English language version.
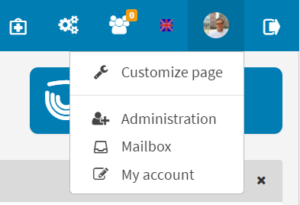
 The profile picture allows you to customize the home page, open the mailbox (these are messages written via “Send Message” and update notifications from Customer Care), manage your own account and open the Administration (if you are an administrator).
 By klicking on this button, you can log out of myconvento.
Below this are by default the five colored main buttons that give access to the five main modules “My Data”, “Researches”, “Newsroom”, “Dispatch” and “Campaigns”.


“Seite anpassen
You can customize the home screen (dashboard) by clicking on your profile picture in the upper right corner and selecting “Customize page”.
The new window has a drop-down menu at the top where you can choose between “Modules”, “Search + adding” and “Hide”.
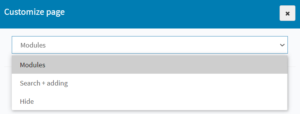
“Modules“ is the default setting here and represents the 5 colored menu buttons as the header of the start page. “Search + adding“ replaces the module buttons with a search bar that allows you to search for contacts in “My Data” and a button to capture new contacts. “Hide” removes the header completely and displays the other widgets enlarged.
In addition, the following elements/widgets can be shown or hidden: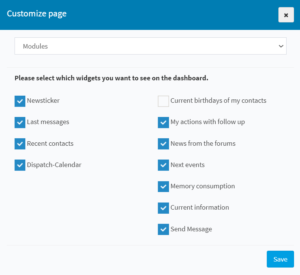
- Newsticker: Here you can create your own news ticker on topics which you can insert in the search bar under “Customize search”. The date anyway the medium and a determined score are displayed here. Click on the name of a news item to get to the article page.
- My actions with Follow up: Users can assign themselves or each other “tasks” in relation to the persons from “My data” and define the date when this task should be completed and a description of this task. Here you can see your “Current task with Follow up” for today.
- Current information: Information about upcoming maintenance work or updates can be found here.
- Next campaigns/events: Campaigns can be viewed with the respective start date and time – filtering by campaign type (invitation, survey, address qualification) is possible.
- Latest news: Here you can see the latest released messages from your news center.
- Memory consumption: Here you can see an overview of the dispatch volume used in the current month as well as the size of your sent files, database, data in the cloud and your media library.
- My latest entries in Contacts: Get a list of contacts whose records you have most recently worked on.
- Dispatch Calendar: Get an overview of the delivery rate of past shipping orders and planned shipments.
- Send message: From here you can send messages to other users of the same license package and view received messages in your mailbox.
- Webinars: Here you can arrange appointments for specific topics that are new to you or that you would like to discuss in more detail.
In order to work effectively with the individual modules, please read the “How Tos”, which describe the typical steps of each module. Have fun and success working with myconvento!